Calabash-ios is an open source tool for functional testing of iOS apps. It has several advantages that put it ahead of other tools, and has maintained its popularity since it was introduced.
One complaint I have about calabash-ios, however, is the extra target I need to create and maintain. In a rather large project with many developers, they all have to remember to add any new classes and resources to both the regular target and the calabash target. Frequently this is forgotten, forcing quality engineers to waste time deciphering build error messages and adding missing files to the calabash target, one by one.
Another problem with the old approach is that adding a new target automatically creates a bunch of new files in the project.
We are so happy to announce that we have found a better way! Our new approach is to create a custom configuration for calabash on the existing target. We also add a new scheme for calabash-ios to build with our custom build configuration.
Ruby and calabash-cucumber gem are needed just as with the current calabash-ios set up. (You may need to do sudo gem install calabash-cucumber)
gem install calabash-cucumber
2. Download calabash.framework
In your project’s root folder, download the latest version of calabash.framework with calabash-ios gem command:
calabash-ios download
You can put it in the root folder of your project or another folder, but please remember that later you will need to configure the path in your settings. For simplicity, we just put it in the root folder of the project.
3. Create a configuration for calabash-ios
In the project navigator click on your project, then in the project and target list click on the project again (Not the target). Then click the “info” tab in the standard editor, and find the “configuration” section.
Click the “+” button in the “configuration” section and choose “duplicate Debug configuration”. A new configuration with name “Debug Copy” will be created, change its name to “calabash”.
4. Add other linker flags to your calabash configuration only
In the project and target list, click on your regular target, then click the “Build Settings” in the standard editor, and search for “other linker flags”. If you can’t find anything make sure “All” tab instead of “Basic” is selected. Click “Other Linker Flags” in the table, then click the arrow to open it. Now move your mouse to the row that says “calabash” and a “+” button should show up. Click the “+” button, then in “Any Architecture | Any SDK”, enter
This will add both CFNetwork and calabash framework to your project when you run the project using calabash configuration.
5. Now you need to tell Xcode where to find your calabash.framework.
In the same “Build Settings” as step 4, make sure your LPSimpleExample target is still selected. Search for “Framework Search Paths”. Click “Framework Search Paths” in the table, then click the arrow to open it. Now move your mouse to the row that says “Framework Search Path” and a “+” button should show up, click the “+”, then in “Any Architecture | Any SDK”, enter
$(SRCROOT)
NOTE: $(SRCROOT) is your project root folder where your .xcodeproj file is located. We are telling xCode to search framework files here. As mentioned earlier, you can download calabash.framework in other folders, just make sure to use the correct path here.
6. Create a scheme for calabash.
In Xcode menu choose Product–>Scheme–>Edit Scheme.
In the edit scheme window, make sure “LPSimpleExample” is select in the “Scheme” list, and click the “Duplicate Scheme” button on the lower left. Then in the “Scheme” list, change the name of the newly created scheme from “Copy of LPSimpleExample” to “LPSimpleExample-calabash”.
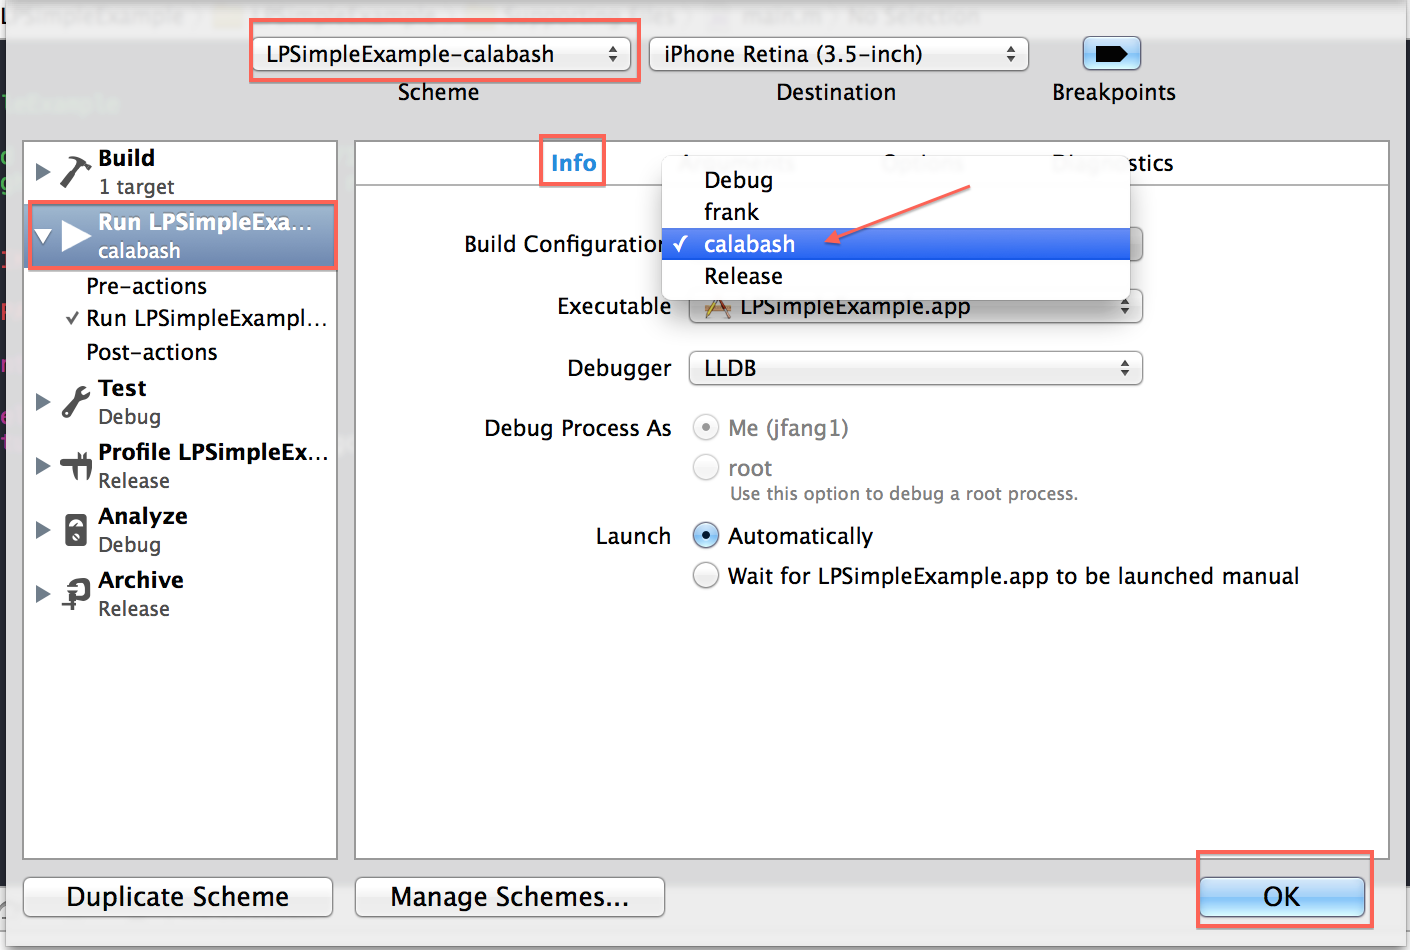
7. Set the LPSimpleExample-calabash scheme to use your calabash configuration.
Make sure the newly created “LPSimpleExample-calabash” is selected in the “Scheme” list, click “Run LPSimpleExample” on the left panel. Now on the right panel, click “info” tab, then choose “calabash” from the drop down list for “Build Configuration”. Click OK.
8. That is it!
Now run it. In Xcode, make sure the newly created “LPSimpleExample-calabash” scheme is selected (to the right of the “Run” and “Stop” button), and then click “Run” button to run the calabash scheme. You should see the familiar message like “Started LPHTTP server on port 37265″ and “bonjour Service Published …” etc.
9. Now you can start calabash-ios console to do queries or calabash-ios gen to generate your feature folder.
Note: if you are using Cocoapods you need to remove the Pods folder and do “pod install” again so that the new configuration will also show in the pods.
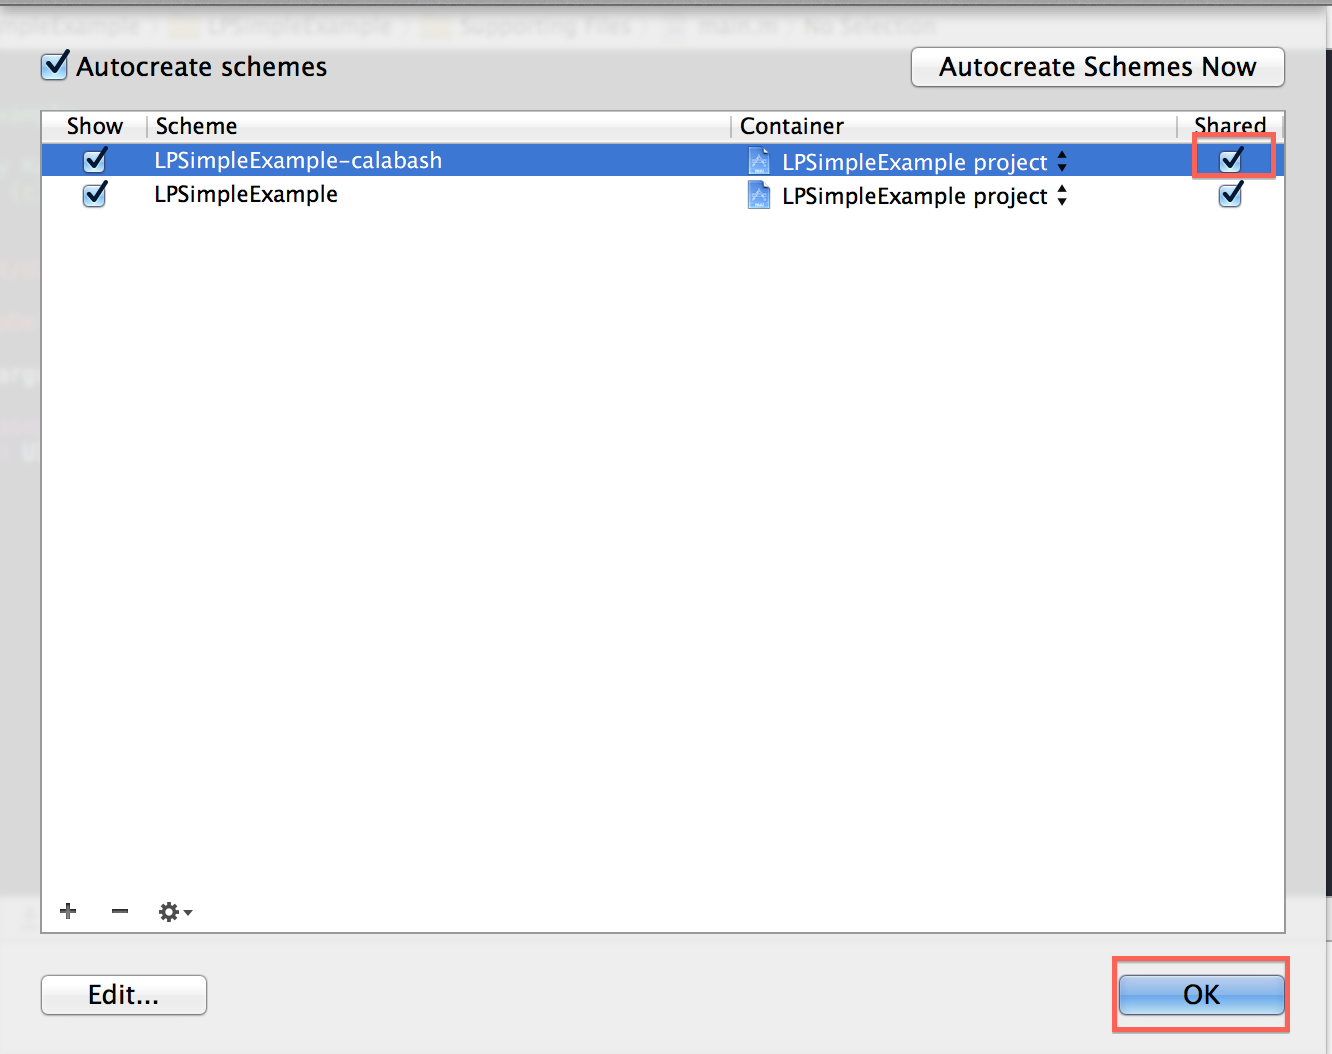
Note: If you are using git. The new scheme is not detected automatically. Go to Product–> Scheme–>Manage Scheme and check the “shared” check box on the LPSimpleExample-calabash scheme, then you will see a LPSimpleExample-calabash.xcscheme file in git status. Git add this file and push the change.
In order to run multiple devices at the same time, you just need to put adb commands in shell script and made earlier ones run in background. In the adb command, specify device by their serial numbers. For example, create test.sh, in which you have
adb -s shell am instrument -w com.mytest.test/android.test.InstrumentationTestRunner&
adb -s shell am instrument -w com.mytest.test/android.test.InstrumentationTestRunner
That’s it!
The best part is that by combining this with auto build and deployment (hint: apache) , you can get fully automated test on multiple devices.
Video below shows a test suite of three very basic tests running on three devices (two physical and a simulator )at the same time.
Connected two devices to ran a Calabash test, works fine!
The first device will fail at “press voice call”, because the script was written for the phone version, and the tablet version does not have this “voice all” selection (It has an image button instead). You will see this does not affect the second test.
if you have 10 USB ports, then you can test 10 devices!
For Calabash-ios, this could be done through the wifi run option. I haven’t tried yet.
Also, this is consecutive. If you use Robotium or Android Unit Test, you can run tests at the same time using instrumentation test runner through adb script. I am only talking about Calabash here.
Please be patient from 1:20 to 2:50 as the query time out and fail. You can drag from 1:20 to 2:50. There is nothing in this time period.
The most important benefit of Calabash is that you can write your test in business-readable domain-specific language, which means you should take the pre defined steps and write custom steps. I will show how to really create custom steps here.
There are four levels, level one and level two and already covered by a famous blog and the Calabash-iOS documentation, but I will go through them again to make it complete.
Note: we will not assert anything here, the purpose is focused on automation.
Before we start hit the Calabash-Android’s Githut home to make sure you properly installed it. Then create a folder for your test, then cd this folder and type “calabash-android gen”. Then grab the Skype Android app as our test app. You can get it from Google Play, then you should re-sign it into debug mode so you test can access the app. Put the apk in the test folder you created.
Pre Level: no customization. We will start by writing a test that uses all pre-defined steps. In your test folder, open my_first.feature and type in following code (change my_username and my_password” to your username and password:
Feature: Voice Call
 Scenario: As a valid user I can log in to Skype and make a voice call
Given I wait for “Sign in” to appear Then I enter “my_username” into input field number 1 And I enter “my_password” into input field number 2 And I press the “Sign in” button And I press the “Enable” button And I wait for “Contacts” to appear
When I press “Contacts” And I wait for “Echo” to appear And I touch the “Echo” text And I wait for “Voice call” to appear And I press “Voice call” And I wait for “00:05” to appear And I take a screenshot And I press image button number 3 And I go back And I go back And I press “Sign out” And I press “Yes”
Now go to your test folder and run
calabash-android run com.skype.raider.debug.apk
or what ever the name of your apk is. It is fun, isn’t it?
Level 1: Macro You notice the pre level test is just like old style procedural program. For a block of code that does one thing, we can just use macro to group it into a new custom step. Here is how:
Go to the step_definitions folder in your test folder and open calabash_steps.rb, and add the following code to the end.
Given /^I am logged in as a tester$/ do
 macro 'I wait for "Sign in" to appear'
 macro 'I enter "my_username" into input field number 1' #replace my_username with your real username
 macro 'I enter "my_password" into input field number 2' #replace with real password.
 macro 'I press the "Sign in" button'
 macro 'I press the "Enable" button'
 macro 'I wait for "Contacts" to appear'
 end
now you can go back to your my_first.feature and replace the first block with just one line.
Feature: Voice Call
 Scenario: As a valid user I can log in to Skype and make a voice call
Given I am logged in as a tester
When I press “Contacts” And I wait for “Echo” to appear And I touch the “Echo” text And I wait for “Voice call” to appear And I press “Voice call” And I wait for “00:05” to appear And I take a screenshot And I press image button number 3 And I go back And I go back And I press “Sign out” And I press “Yes”
Now run it. your code is much shorter due to this customization! You should do this to all blocks of your test scripts that you use quite often. This is just like create a function and then later on you just call the function instead of writing all the code again. Now level two!
Level 2: add Ruby/Cucumber code in calabash_steps.rb file in the test folder
This requires you to understand what the pre-define the steps really, so dig into the source code of the step definition at
to read them. For our tutorial, we want to add a custom step to make sure we are on the Skype home screen (not really necessary, but doing it for the purpose of the tutorial). Notice that the “Share” EditText filed always say “Tell friends what you’re up to”, so we know when when see “Tell friends”, we are on the home screen. This tells us we can modify pre defined assert steps to do our job. Open https://github.com/calabash/calabash-android/blob/master/ruby-gem/lib/calabash-android/steps/assert_steps.rb and copy
Then /^I see the text "([^"]*)"$/ do |text|
 performAction('assert_text',text, true)
 end
to the end of you calabash_steps.rb and change it to
Given /^I am on the Skype Home Screen$/ do
 performAction('assert_text', 'Tell friends', true)
 end
and add one line to your my_first.feature
Feature: Voice Call
Scenario: As a valid user I can log in to Skype and make a voice call Given I am logged in as a tester And I am on the Skype Home Screen
When I press “Contacts” And I wait for “Echo” to appear And I touch the “Echo” text And I wait for “Voice call” to appear And I press “Voice call” And I wait for “00:05” to appear And I take a screenshot And I press image button number 3 And I go back And I go back And I press “Sign out” And I press “Yes”
Now run it! You just created another custom step using Ruby code. To be really creative and productive you should understand all the .rb file of the pre defined steps. All of them can be modified to satisfy your customization needs. So study them. These files are usually located under Ruby/Gems/1.9/gems/calabash-android-0.4.2/lib/calabash-android/steps under this folder you should find these files. Study them! additions_manual_steps.rb app_steps.rb assert_steps.rb check_box_steps.rb context_menu_steps.rb date_picker_steps.rb enter_text_steps.rb l10n_steps.rb list_steps.rb location_steps.rb map_steps.rb navigation_steps.rb press_button_steps.rb progress_steps.rb rotation_steps.rb screenshot_steps.rb search_steps.rb spinner_steps.rb time_picker_steps.rb
Level three: use your custom steps file in any test The two levels above will only affect your current folder/project. To use your custom steps in any of your test, you can just put them in .rb file, and then include (require) them in your xxx_steps.rb in your test folder. using examples from level 0, 1, 2 above, you can create a login.rb and put it in a location dedicated for Calabash rb files. for example, in /Users/your_user_name/rbfiles folder, your create a login.rb file
require 'calabash-android/calabash_steps'
Given /^I am logged in as a tester$/ do macro ‘I wait for “Sign in” to appear’ macro ‘I enter “tester.skype44” into input field number 1’ #replace my_username with your real username macro ‘I enter “ts44pass” into input field number 2’ #replace with real password. macro ‘I press the “Sign in” button’ macro ‘I press the “Enable” button’ macro ‘I wait for “Contacts” to appear’ end
now, you can use “Given I am logged in as a tester” in many test folders as long as your “require” it in your features/step_definitions/xxx_steps.rb such as this
When …. #now you can use “Given I am logged in as a tester” here
And your .feature file is not affect.
Level four: Best part! Java level customization! write your own server side code
In order to do this, you should understand how Calabash-Android works. Under the hood, Calabash communicates with a tiny http server it installed to your device. On that server side, it uses Robotium to interact with your app. Calabash is just the language that makes the communication easy to understand in plain language. If there is something your Calabash can not do but Robotium can do, you can white your own server side code and tell Calabash what sentense to use in order to do it. Let’s do an example.
Notice Calabash-android does not mimic phone rotation landscape or portrait, which often cause UI problems or even crash. In its document https://github.com/calabash/calabash-android/blob/master/ruby-gem/lib/calabash-android/canned_steps.md it says this about rotation:
Rotation These steps do nothing if you run them locally. If you run the test on LessPainful they will actually rotate the physical device.
Then /^I rotate the device to landscape$/ Then /^I rotate the device to portrait$/
However, Robotium IS able to set device landscape or portrait, you can find this method in Robotium doc
public void setActivityOrientation(int orientation)
So, we will write the Calabash server side code to set the screen to landscape, and create custom step to do it in Calabash! (for portrait just do the same thing)
1) First, you need to clone the Calabash-android source code, follow the instruction at https://github.com/calabash/calabash-android/wiki/Building-calabash-android
2) Then, using text editor or your IDE, add the java file to the source code. For our example, I added SetLandscape.java under this folder: calabash-android/ruby-gem/test-server/instrumentation-backend/src/sh/calaba/instrumentationbackend/actions/gestures
@Override public String key() { return “set_landscape”; } }
Have you been wondering what is those performAction (‘xxxx’, ‘xxx’, xx) is? It is the Ruby code to send the “key” to the server. I will show you how to use it in a bit.
3) build Calabash that includes your own java code You need Android SDK level 16 installed as well as bundler and rake. To build and install the gem go to the ruby-gem folder run rake install
cd ruby-gem
 rake build
if your build is successful you should see something like this
BUILD SUCCESSFUL
 Total time: 25 seconds
 calabash-android 0.4.3.pre7 built to your/git/folder/calabash-android/ruby-gem/pkg/calabash-android-0.4.3.pre7.gem.
Then you can install the new gem you just built sudo gem install /your/calabash/android/gitfolder/calabash-android/ruby-gem/pkg/calabash-android-0.4.3.pre7.gem
4) Add custom step definition.
You really should add this custom step in a .rb file in the git folder and build it together with the java code. If you add it in a exsiting .rb file, you don’t need to even add the “require” in the files that will use it.
But I am being lazy here by adding it in test folder only. In your features/step_definitions/xxx_steps.rb or any .rb file in your dedicated Calabash folder (you learn this in level 2 and 3 above), just add
Then /^I set the screen to landscape$/ do
 performAction('set_landscape')
 end
now when your Calabash script says “Then I set the screen to landscape”, it will performAction(‘set_landscape’), which sends the key ‘set_landscape’ we defined ourself to the tiny http server on your device, which in turn runs the Robotium (java/android) code to set the phone to landscape! This tutorial of level 4 might look simple, but there are so many things could go wrong in every step, so hit me with questions when you get stuck.
Now A picture is worth a thousand words! Then a video is worth a hundred thousand words! we will do the old routine and run Skype and call Echo and take a picture, but I will set the phone landscape once log in without touching it and make sure everything works just fine in this mode. (Note the phone was in portrait mode during sign in).
and…don’t steal my test account password 🙂 The only benefit from it is sending me messages on Skype. There is on other contacts in it.
Afterthoughts: What if I want something even Robotium can’t do? git clone and modify Robotium!
Robotium is also a great open source project, which mean you can pull the source code and modify or extend it as well. Robotium uses android.test.ActivityInstrumentationTestCase2. Android unit test. So you can go from there and extend Robotium. Things will be a bit complicated afterwards because you need to create the jar file and replace the robotium jar file in your Calabash ruby-gem. But it can be done. I will write a tutorial…if there is a need.
Another thought, Robotium vs Calabash? As you see above something is missing in the translation. It can be done but is just not done yet. So Calabash can do less than Robotium. However it is easy to understand easy to use; the script management is also easy. Even if you need to write some Ruby code, it is still easier than writing Java.
Robotium is powerful but the test suite management is not as easy. Tests in one project file run alphabetically so you have to play with their names for correct order. And as the number of test projects grow your IDE looks really messy.
So Robotium or Calabash? Both! Both are still being improved and more is coming. In the meanwhile, go back to the basics sometimes. Use android.test.ActivityInstrumentationTestCase2 when neither of these satisfy your needs.
Update: This blog is outdated because Robotium already implemented the screen orientations. However, the method here still works. You can use some different name to try it out.
Be patient from 00:10 to 00:24 as I run the program.
Here I wrote a small Robotium project to test Skype apk I got from Google Play after properly processing it. No source code is needed. I clear previous user name and enter new username/ password, go to contact, call Echo / Sound Service, turn on speaker to make it louder, take a screenshot at exact 5 seconds (or any time you want), then end call, go back and log out.
The screen shot is in Robotium-Screenshot folder on sdcard. You can add time stamp to the file name in Robotium so you can take a lot of screenshots.
The only drawback is that the password will show up on device, whether you use enterText() or typeText(). I think I might have a solution but I haven’t try it out.
If you just started to do this now, the best guide I can find is HERE. However, there are two places that might give you troubles. So when you are following the guide, keep two things in mind.
1). in step 3. After reboot, create new Guest OS on VirtualBox and choose MAC OS X server
10.7.2 does not show MAC OS X server in VirtualBox 4.2.4. However, both MAC OS X and MAC OS X (64 bit) will work. I have both installed and running well. (See pic)
2). After 16. choose our installed partition for booting using arrow key and press Enter
Your screen might seen to freeze with a process ring keeps spinning forever. May be you are thinking “oops, this does not work”. Don’t panic, you have the ubiquitous problem solving tool for Windows–reboot. No, do not reboot your Windows. Just reset the OS X you installed in VirtualBox menu.
You are done.
VirtualBox wins VM Player this time. I was not able to install it on VM Player.
A project I am working on requires testers to input some 2750 integers and their +0.1 value into the search box on an Android devices, and compare result from server to records in a XML file. Good thing is that the numbers are consecutive. Good candidate for automation. Note that it does not require any code access.
Combining codes in my earlier posts here and here, I was able to fully automate the process, only need to pause to compare the result.
The pros of this method: work straight out on the shell, don’t need source code, don’t need re-sign apk (as Robotium does).
The cons: For different screen resolution and Android version, you will need different code. Robotium wins here.
What’s next:
1) xml parsing! I already created sample code to use InstrumentationTestCase2 to do Android unit test, and compare the parsed xml result with “mock” server result. This will require source code in order to build the unit test to it. I don’t feel like reverse engineering the product so I will probably stop here. I already know how to do the unit test with the “mock” server result.
A couple of friends was asking how to do loop in shell scripts. Here is some simple code.
To loop in DOS: @set /p start="From:"
@set /p end="To:"
:while
@REM test condition
@IF %start% GTR %end% (GOTO wend)
@REM procedure where condition is "true"
@REM replace with real operations
@echo %start%
@REM set new test value
@SET /a start=start+1
@REM loop
@GOTO while
:wend
This will print the first number to the last number you input on the screen. Replace @echo %start% with your real operation.
However, DOS script does not handle real numbers. So if I want to loop from 1 to 10, and print the number + 0.5, this will not work. One solution is using Perl. Second, using Linux. Here is the code for Linux.
#start loop
for ((i=start; i<=end;i++))
do
echo "$i+0.1" | bc
done
If you input 1 and 5, this is print 1.5, 2.5, 3.5, 4.5, 5.5.
Enjoy.
Note: I did not create these codes. They are from Google search. However, they are from different sources (especially the use of bc) so I lost the source link.
Thanks to SoftTeco. I found how to send touch event directly to Android devices. However, his code works for 2.3.3, but not ICS and Jelly Bean. (I did not test 3.x).
However, his great blog not only gives you the code, but also tells you how to get it. After searching valid code for ICS without any result, I just catch the codes using adb shell getevent | grep event2
Then convert Hex to decimal.
Here is the code to touch the center of my GS2 (240, 400) running AOKP ICS 4.0.X ( I am lazy, this is NOT the newest version of AOKP) adb shell sendevent /dev/input/event2 3 57 29
adb shell sendevent /dev/input/event2 3 53 240
adb shell sendevent /dev/input/event2 3 54 400
adb shell sendevent /dev/input/event2 3 48 29
adb shell sendevent /dev/input/event2 3 58 2
adb shell sendevent /dev/input/event2 0 0 0
adb shell sendevent /dev/input/event2 3 57 4294967295
adb shell sendevent /dev/input/event2 0 0 0
As you can see, only 8 lines of code is needed now, versus 16 lines for 2.x.
Also, if you run this on DOS cmd, copy all lines and add one more line of something, and paste it all to execute all 8 lines. If you don’t add one more line, you only run 7 lines and result is unpredictable.
You can also put all of them in one line with no new line break: adb shell "sendevent /dev/input/event2 3 57 29;sendevent /dev/input/event2 3 53 240;sendevent /dev/input/event2 3 54 400;sendevent /dev/input/event2 3 48 29;sendevent /dev/input/event2 3 58 2;sendevent /dev/input/event2 0 0 0;sendevent /dev/input/event2 3 57 4294967295;sendevent /dev/input/event2 0 0 0;"
I did not test it on Jelly Bean, but I think it should be same.
Again, the credit goes to SOFTTE, I am merely using his method to get the code for a different version of Android.
Revision: Tested on Jelly Bean. Different code. So your best shot is getevent.
Did you want to add listener to your spinner to do something, say, play one of the listed sounds? The problem is, when you enter this activity, your code will set the spinner as well. Guess what? It will trigger the listener as well!
keep the selected positions in field variables. (like currentPos1, currentPos2)
the listeners onItemSelectedListener() call a method like refreshMyResult() or whatever.
when setting positions programmatically, set the spinners and call your own refresh method manually right after that.
The refreshMyResult() method looks like this:
int newPos1 = mySpinner1.getSelectedItemPosition();

int newPos2 = mySpinner2.getSelectedItemPosition();

// only do something if update is not done yet

if (newPos1 != currentPos1 || newPos2 != currentPos2) {
              currentPos1 = newPos1;
        currentPos2 = newPos2;
         // do whatever has to be done to update things!
         //This would be in the "old" listener
}
Or, may be customize your spinner. For example, to play a sound in a spinner item, add a play button in the customized spinner item, and use listener for that.